
When searching for our new house in 2010, I knew I wanted a great kitchen.
Layout, lighting, storage and counter space were very important, but most of all, I wanted my new kitchen to be pretty!
After touring dozens of homes, it became clear the kitchen in my head was not in a house my wallet could afford.
The house we chose was perfect for us, and our budget, but the kitchen was straight off a spec sheet. With that said, the bones were there, and I knew I could make it something special.
Here's what we had to work with:

The countertops were a black granite formica and the backsplash a neutral ceramic tile. In my Dad's opinion, it was a fine kitchen. However, I had watched too much HGTV to be satisfied.
So about a year later, we jumped in. We got three quotes from natural stone installers, even though my Dad thought we should have done the work ourselves.
After two hours in the granite warehouse, we selected a New Venetian Gold slab and started the demo. We removed the existing formica countertops, sink and faucet and sold them on Craig's List for $200 to newlyweds with their own remodel.
We also decided to remove the existing backsplash and pick tile that better complemented the new granite.
Let me just add that tile does not come off easily! We ended up cutting the sheetrock out as you can see below. While I was hesitant to go this route, it allowed us to wire for under-cabinet lighting. I should clarify that we brought in a professional electrician for the job, who happens to be a good friend with a great rate!
The countertops went in quickly, and we were thrilled with our choice. {I'll get to the amazing sink in a second.}


After the wiring for the lights was complete, my helper got to work replacing the sheetrock:

It took us months to find the perfect tile for the new backsplash, but we finally decided on three types of polished marble and travertine for the following design:
 |
| {Jeffrey Court 3x6 Durango, Jeffrey Court 12x3/4 Walnut Travertine Dome, Jeffrey Court Latte Sticks} |
When ordering tile, measure the length and width of your space and multiply the two to get the square footage. I had about 28 square feet but ordered a little extra to allow for errors.
The thin strips of tile above came in 12x12 sheets, but I cut the backing to allow for two, six-inch sections.
My supply list included:
- Wet saw (Available for rent from Lowe's and Home Depot for about $40 a day)
- Dremel tool with diamond blade for small cuts
- 1 tub thinset (I used MAPEI Type 1 Tile Adhesive from Home Depot)
- Notched trowel for applying thinset
- Level and tape measure
- Rubber tile spacers
- 1 small bag non-sanded grout
- Large sponge
- Tile float
- Bucket
I started tiling in the most visible section and worked my way to the corner. I also gave some thought to whether my tile should be flush with the cabinets or the countertop and decided on the cabinets.
I learned from reading other blogs and online resources that the tile should not rest on the countertop or butt against the cabinets. Using silicon caulk as a barrier avoids crakes caused by normal settling.
So after making decisions about placement, I got started with the thinset. As you can see below, I applied a section with the flat side of the trowel and went back over with the notched side. It's important to not apply too much thinset. If you do, it will ooze out as you press the tiles in place, and you'll just have to scrape it up.
 |
| {My notched trowel is visible here.} |
 |
You can see in the photo above how I used spacers to keep the first row of tiles off the countertop and to leave space in between the tiles for grout. It's also very important to use the level across the tops of the tiles and on the face. You want them flush in both places. Using uneven amounts of thinset will make it difficult to keep them flush on the face.
I also used a strip of wood to create a level line on the sheetrock behind the stove. Had I not done this, the tiles would have shifted slightly with gravity before drying.
 |
| {Note the under-cabinet light hanging in the top-left corner of the photo. We ordered the LED Thirty Puck Light from American Lighting. They last forever, provide plenty of light and stay cool to the touch.} |

I want to share a handy trick from our electrician friend concerning tiling around the outlets. Instead of cutting the tiles beforehand, we removed the plugs and tiled over the boxes. The Dremel tool with the diamond blade made it easy to cut them back in and reinstall after the thinset was dry. Just remember to mark the exact locations with tape!

 |
| {Note the tape marking the outlets here.} |
Once all the tiles were in place and dried overnight, it was time to grout. For some reason I didn't take any pictures of this step, but it's not difficult. It is important to follow the instructions on the bag for mixing to ensure the consistency is right. Once mixed properly, apply the grout to the tiles, scrape off the excess and use the tile float for even application. We learned the hard way that un-sanded grout, when left to dry too long, does not come off easily! Ours dried quickly and was ready to be sponged within about two hours. Just follow the instructions and use your best judgement. You'll need to sponge the tiles several times to remove all the residue.
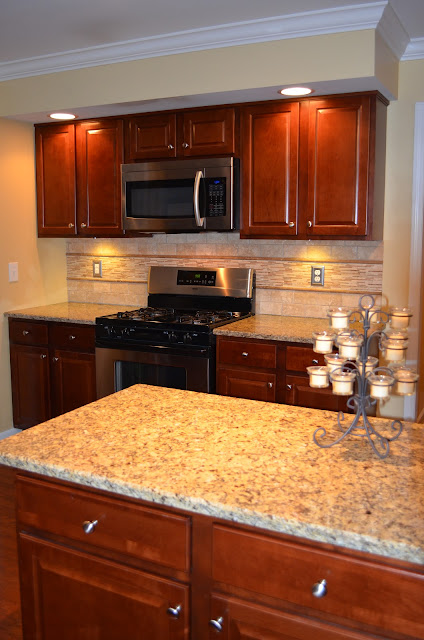
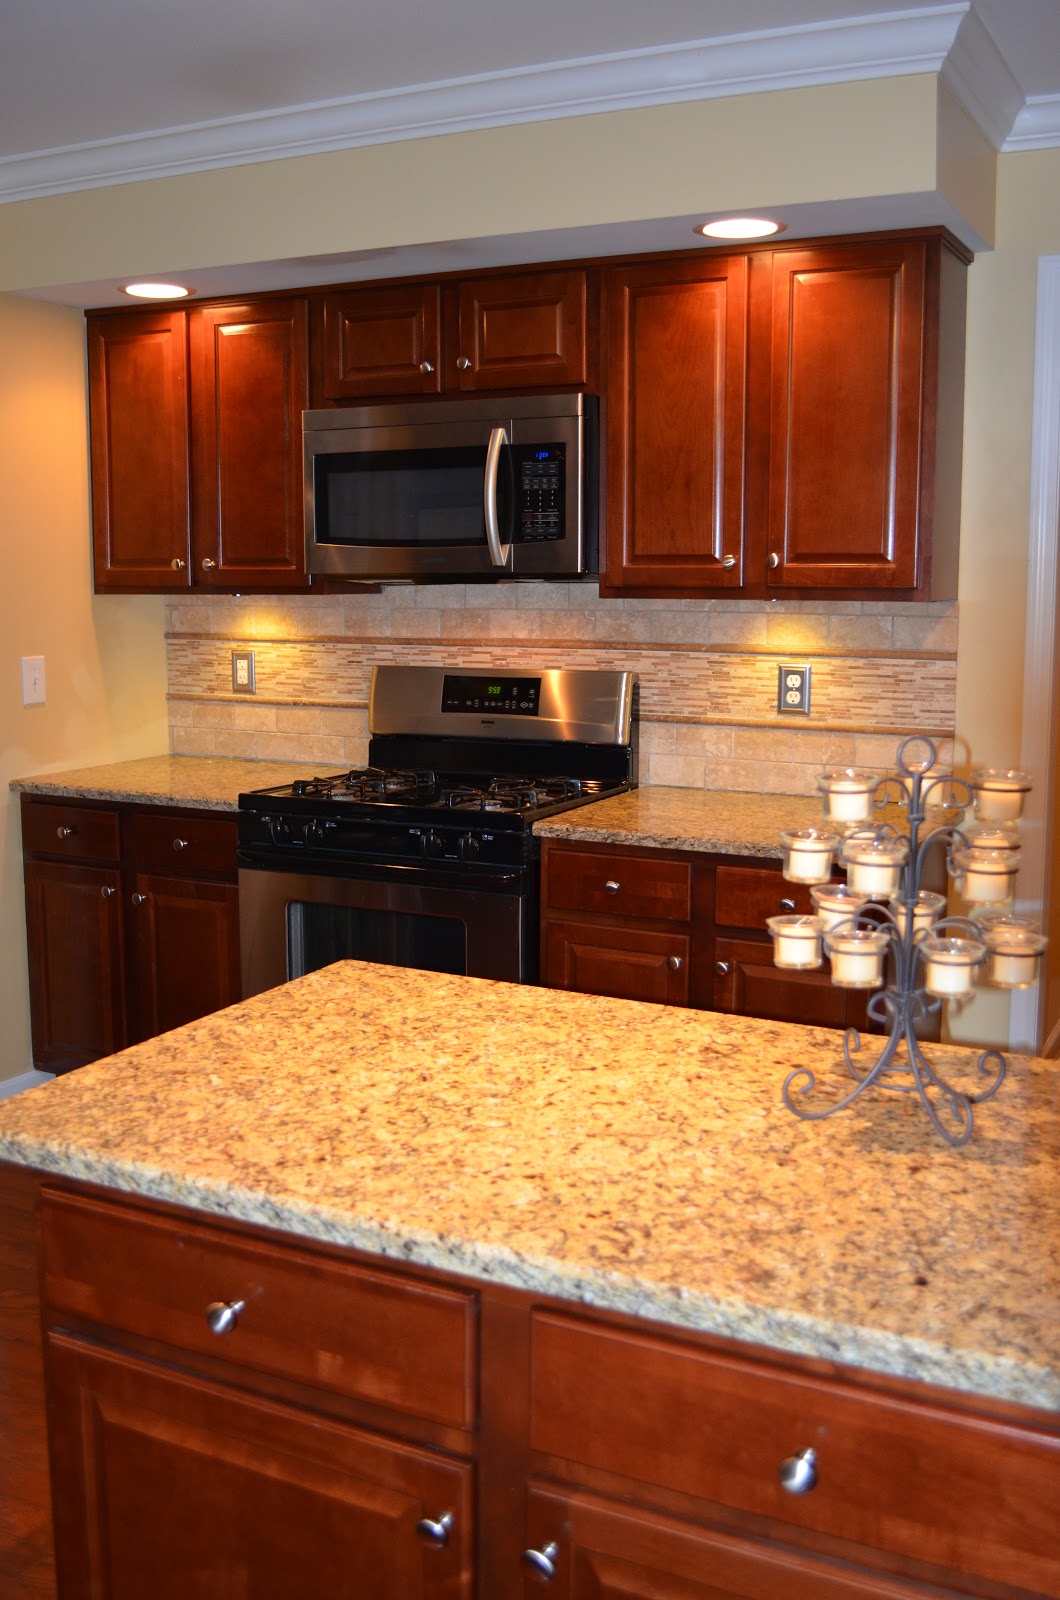
Now, time for the unveil!
After two long days of measuring, cutting and gluing, our new kitchen was complete! See what you think:


Another consideration I'll point out is about the faucet. I hate that gross lime buildup that collects around the base of the faucet and opted for as little opportunity for that as possible with our new faucet. With only one interruption in the granite, it's easy to keep the area clean.


Every Southern Living reader knows the hot ticket right now is a farmhouse sink. While we didn't go with a traditional ceramic farmhouse with an apron, we opted for the AMAZING stainless steel version! It was only a slight upgrade from the standard double basin option and is my favorite part of the project. Children, small dogs and crock pots welcome!

Another consideration I'll point out is about the faucet. I hate that gross lime buildup that collects around the base of the faucet and opted for as little opportunity for that as possible with our new faucet. With only one interruption in the granite, it's easy to keep the area clean.
 |
| {Price Pfister Hanover faucet purchased on eBay. I'll do a separate post on installing a new faucet.} |

Well, what do you think? Did we make good selections?
We LOVE our new kitchen and are so glad we decided to tackle the project. The neutral colors complement the granite and flow well with the rest of the house. The under-cabinet lights are handy for prep work and show off the tiles at the same time.
I can't stress enough how doable this project is for even someone with little do-it-yourself experience. The hardest part was picking the materials!
Please let me know if you're embarking on a similar project and have any questions about the steps I've discussed.
Good luck!


